3

Monday Mani with Essence the gel nail polish range

I’m back 🙂 It has been a long months holiday with my daughter on school holidays for a month and a house full of family members visiting. I am very happy to be back to normal and back on the blog!

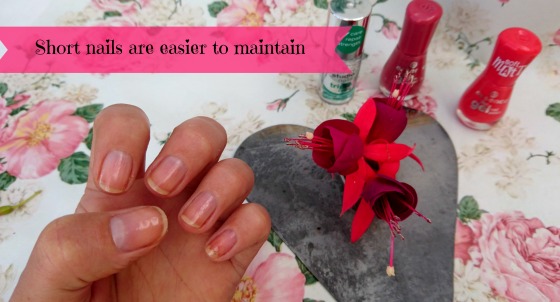
Starting off with a quick and easy mani on short nails. I cut my poor nails after the holidays because cleaning house up after everyone left my hands and nails looking old and dead! I also find that my mani lasts longer without chipping on shorter nails. This is literally just a super quick on the run mani I did in the rush to get back into work routine so anyone that is busy can pull this off quick.

Essence nail polish

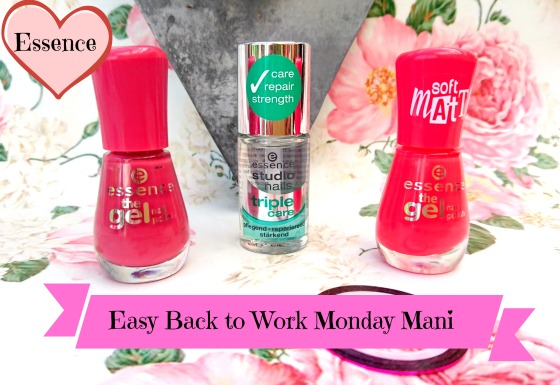
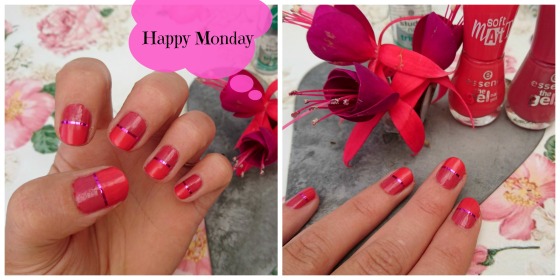
For this weeks easy mani I used the essence gel nail polish range in two different pink shades as well as the essence nail art strips for some extra bling and beauty.

prep your nails by cutting, filing and painting on a base coat. I used the essence triple care as a base coat because my nails need the extra TLC at the moment. The Triple care makes sure your nails are healthy by caring for them and adding repair and strength.

monday mani with essence.jpg

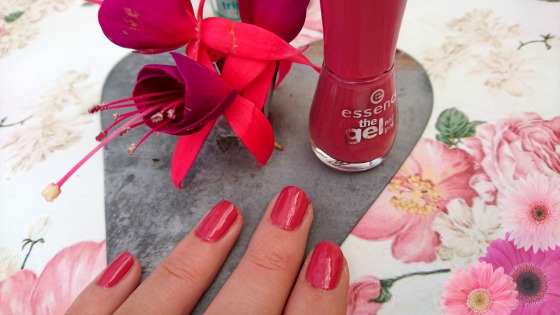
My go to nail polish brand for a good glossy mani that lasts is the essence gel nail polish range, It is the only range I have found that actually lasts a good few days on my nails. To start this nail look paint one nice coat of the first color of your choice (you can mix and match shades you like) I used the shade 48 my love diary. The gel nail polish range gives nice cover with only one good coat and it dries fast so no sitting around waiting!

Essence the gel nail polish.jpg

After your first color is dry then use your second color to paint the top half of your nails, also with just one good coat to cover it.  I just free handed it but you can use normal sticky tape as a guide line or tho its good to practice free hand and you get the hang of it fast, The nail art strips also hide any messy lines when added 🙂 My second shade was the 47 va-va-voom.

easy monday mani.jpg

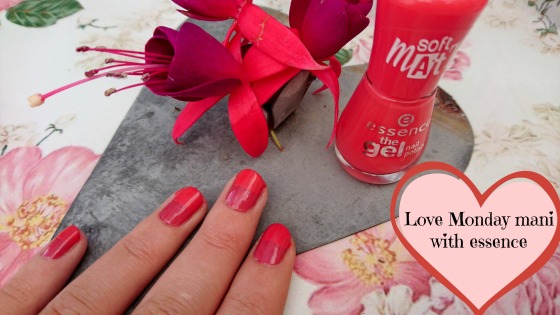
The last step in this mani is to put a nail art strip over where the two colors meet, I used a pink stripe but you get them in different colors. You can see immediately how this just neatens up the whole look and brings it together!

Essence nails

Ill have my next post up on Wednesday and its a bit of a personal one on whats been happening my side lately 🙂


Beauty Blogger – South African Beauty Blogger – Beauty News and Reviews

1

Blue and purple Monday Mani using essie nail lacquer

Happy monday again everyone 🙂 And happy November, can not believe the year has gone so fast!! It is Monday Mani time again and here is a funky and very easy blue and purple nail look that anyone can pull off.

essie gel setter top coat

For today’s manicure I have used the essie polish shades “blossom dandy” and “Flowerista” as well as the new essie gel setter top coat so I can now give you feedback on how well that works!! Remember to always do the usual prep work before painting your nail color on, start by cleaning your nails with a cotton pad and some nail polish remover. Push back your cuticles and make sure your nails are the desired shape. Please also remember to use a base coat, I can not stress enough how important a good base coat is, It helps protect your nails from damage and discoloration as well as helps prolong your manicure.

essie blossom dandy

Step one of this nail look is to use the light blue blossom dandy shade and paint two very thin coats on to get a good even color. Once This is dry then you will need a pointed nail tool or even a bobbi pin hair clip or anything thin and pointy that you can use to draw lines on your nails. Then doing one nail at a time cause you need to work fast, apply a good coat of purple over the blue and quickly use your little tool to gently draw lines on your nails and this should reveal the stunning blue shade underneath. You do not have to push hard when drawing your lines as you do not want to scratch away the blue shade underneath. Give a few minutes to let this all dry and set and then you can go ahead and paint over a top coat to smooth it all out and add shine.

Essie flowerista

This is actually so easy and you can draw any shapes maybe a smiley face, hearts, flowers ….. be creative!! It is supposed to be a fun summer look. The New essie gel setter top coat has proven to be fantastic! I was a bit nervous considering the price being R169, but it makes a big difference in achieving that gel like shine and helps my nails last a few days longer than they normally do. Normally I don’t make day 3 without a chip but with this top coat I can do about 5 days before any real chipping appears. Please note that I work a lot with my hands and with all the house cleaning and picking up after my toddler I don’t get as many days wear as someone that is less busy with their hands would. So I would think if you are more careful with your nails you can definitely get a week or more out of your manicure!

1

Colorful Monday Mani with Essie nail lacquer

Monday again 🙂 so lets get the week rolling with a funky Monday manicure! I have fallen in love with Essie nail lacquer’s and invested in a few shades to spoil myself. Here is what I did for my Mani this week.

Also just to add quick, go check out my Facebook page as I am almost at 1000 likes and I am planning a lovely giveaway to celebrate! …..

Essie nail lacquer

I am loving bright funky colors now with summer that is coming and I decided to mix it up today and go full on bright with different colors 🙂 It is definitely one way to draw attention to my hands and I always get people saying they love the multi colored nails. I literally just took 1min to pick a few random colors at clicks while they are having a 3 for 2 special 🙂 Just couldn’t resist.

Essie flowerista

Always remember to clean your nails nicely before applying nail color, you can do this by wiping the nails off with a cotton pad and some nail polish remover. It is also important to push back your cuticles and apply a base coat before you apply color to your nails. Then you can go ahead and mix up the colors and create your mani look.

Essie summer colors

I used the following Essie colors: pink diamond, blossom dandy, flowerista and bachelorett bash. I chose to do the thumb and little finger the same nail cause I am a color short here from a full hand lol. But I did find that doing the thumb and little finger the same color in a way framed the hand. I then just did the other nails different colors to make it colorful and funky!

Monday mani

Hope you like my Monday mani and do yourself a favor and go take advantage of Clicks and Dischem’s current 3 for 2 specials on Essie polish. I love the thin consistency of the product and how it applies so effortlessly and dries so quickly!

3

Monday Mani with Essie & Revlon

Monday again and with what seems like a long week ahead we definitely need a power mani to get us through the week. Since it is October and Breast Cancer awareness month I have decided to do everything pink on the blog this week in support of breast cancer awareness!! I put together this weeks nail look using my new favorite color from essie and some wonderful Revlon nail wraps!

Essie

This is such an easy quick do it yourself mani, took me maybe 20min including drying time so that’s easy to pull off even if you need a pretty nail look on short notice. The first step is to quickly prep your nails, file them to shape and make sure they are clean, the best way to make sure they are clean is to wipe them off with a cotton pad and some nail polish remover to remove natural oils and any other dirt that is on nails. Even if your nails look clean you should still do this step cause natural built up oils on nails and dirt you cant see can cause your nail polish to peel or chip quicker.

Revlon nail art wraps

I found these really cool Revlon nail art wraps for R29-95 !!! So obviously I bought them lol 😉 These 3D Candy vibes nail art wraps are so super easy to use, the pack comes with 18 nail shaped wraps in different sizes so you get all your nails covered and have extra if you maybe made a mistake or to just do one or two nails here and there. The pack also comes with a handy little nail file and little plastic tool to clean nails and push back cuticles. You just peel them off and then i like to apply to the back of the nail and then press down towards the front and pull over the sides. you then just fold it over the front of the nail and use the nail file provided to file off the front piece that is too long and shape it around the front of the nail. Make sure to rub as it a bit to make sure that it is properly stuck down. Really very easy!!! I chose to just do my ring fingers this time instead of my whole hand.

Essie Bachelorette bash

The beautiful pink nail color I paired this with is my new favorite one! It is the essie batchelorette bash shade! I absolutely love it! It is such a bright girly pink shade that is perfect for this time of year, I feel now with the weather getting warmer that I am looking more for bright vibrant fun nail shades to energize my day. I love the essie nail colors cause they are easy to get on and off, I am sick of struggling with nail color that doesn’t apply properly or goes on thick or that is a big mission to get off. so annoying. The essie is refreshing cause it goes on neat and thin and two thin coats gives long lasting perfect color and if I do get a nail that peels or chips in front (my nails don’t last too long before chipping off the tip) then it is so easy to take off and just re-apply that one nail.

So that is the super easy nail look I am rocking this week!! Happy Monday and I hope everyone has a stunning week 🙂

Monday Manicure

4

Girly Glitter Monday Mani using Essence products

I have gone all pink and glittery for today’s Monday Mani looks 🙂
Iv done two very easy super quick to achieve looks that are sure to brighten up your week!!

image

My first nail look for today is a super Glittery pink one that will instantly bring sparkly girlyness to your week!!!
I used the Essence the gel nail Polish range as well as the Essence nail effects 3D flitters.

image

So quick and easy you just paint the gel nail Polish base coat onto clean nails. Get your 3D flitters ready, I just did my nails over the cap of the flitters container so it catches any that fall. Now do one nail at a time and paint a nice coat of the pink gel nail Polish and give it like a few seconds to just settle and then while it’s still wet you sprinkle the flitters over the went pink coat so that they stick to the nail,  tap on the flitters lightly to make sure they have stuck nicely and then move onto the next nail, carry on until the whole hand is done. To finish the look just tidy around the edges and cover with a decent coat of the gel nail Polish top coat and give it a good 10min to dry and settle 🙂 very easy and looks all fancy and sparkly!!

image

Ok so then number 2 on my list for Monday Mani is a purple and pink mix also using the Essence the gel nail Polish range, base and top coat as well as the purple and pink. And you will also need a multi effect nail art brush for this one, they are a good cheap R36 at dischem. You can do this with any two colors, or even 3 or 4 colors 🙂

image

Start your prep work by doing a coat of base coat on clean nails and allowing it to dry.
Then you take your two colors and the nail art brush and apply the nail Polish onto the brush putting the colors next to each other half half like in the pic below

image

Then moving quickly so the Polish doesn’t dry you align the middle where the colors meet with the middle of your nail and just brush down. If you want a more marbled effect to can swerve the brush from side to side to mix colors when brushing onto nails. Do one nail at at time re applying nail Polish to brush for each nail. I suggest you do two coats of this on each nail, you can blend colors better on the second coat and then just allow to dry and apply the gel nail Polish top coat.

image

image

If you have the gel nail Polish range and a few colors you can really play around with the nail effects brush and mix colors on the brush for a nice ombre,marbled look!

Hope you enjoyed these two 🙂
Remember to keep an eye on my Facebook page in the next few weeks for my big birthday Giveaway Competition!!!
https://m.facebook.com/prettymessymellon

You can also follow me on twitter and instagram
@Mel_delaCroix
Pretty_messy_mellon_

Xx

5

How and what i used to do this weeks Monday Mani :) Catrice , MAC, Essence

Happy Friday all!  I thought since it is now Friday and you guys maybe have some time on our hands over the weekend to do your nails, ill tell you how i did my lovely Mani this week and what products i used! so glad everyone liked it this week, the response was lovely! So maybe you can try it or a version of it over your weekend 🙂 lemme know if you do!

catrice

Ok so this is actually so very basic to do that its not going to take me very long to explain! Firstly i Used Catrice products for this look, The Catrice Revolutionary 3 step base and Top coat and then this lovely Catrice color in 82 A Gallons of mellon!! And then the Nail art strips are Essence holo nail stripes.

So firstly you do your base coat on clean , shaped and prepped nails…. Give that a few minutes to dry and then you can do one coat of your color and once that is dry then a second coat of color to get your color just perfect! I normally give like a good 10min after this for all of that to settle and dry and then move on..

Catrice nails

Next you do the Top coat and give it  a minute and while its still kinda sticky, but not like smudge it sticky. You can start applying your holo nail stripes, they are adhesive stripes so they do stick to where you apply them and once you have the hang of it its super easy! just have a nail clipper or small scissors handy to trim your pieces, i apply first and then trim off the edge of the nail so i can get the amount right.

essence holo nail stripes

Make sure that you press down properly on the strip and that it is solidly in place 🙂 it should be nicely stuck to your nail polish! and then you can go ahead and put a decent coat of top coat on over all of that just to set the stripes in place!! and you are done hehe yay! super easy actually!!!  Now i also did this with my new MAC nail color cause i was just too excited to try it out so i sat and did my nails all over again lol but it came out stunning so here is a pic!

MAC wash and dry

This is the MAC wash and dry collection nail lacquer in shade “washeteria”

So as you see you don’t need much to get this right 🙂 its super easy! If you find that the nail stripes are lifting at the sides then just clip the end with a nail clipper and dab a small amount of nail polish remover on the ends. should fix it up!

All these items (except the MAC of course) are available from Dischem.

Happy weekend!!

xx

0

Essence Products Review and color swatches . All the Nudes :) & the Gel nail polish.

After the last few excited weeks of playing around with the Lovely Essence products i have now finally almost finished with them, here are my thoughts on the following products 🙂

To start off with the i love Nude range of eye shadows , they are so lovely and soft to the touch and apply well, the two Nude colors i tried worked well for a nice basic winter nude look and are also great for mixing with colors to spice it up a bit. some of the shades i found were so close to my own skin tone that i couldn’t notice that i was wearing it but this is great if you want a nice wear it to work minimal look for the day. They lasted well on my eyes and made the day 🙂 so hip hip hooray!!

i love nudes eyeshadow

nude color swatch

In order from Left to right in the pictures the colors are , 03 Creme Brulee , 05 My favorite touping , &15 Hazel me not (soft touch long wear)

Next up is the i love Nude lip items i tried out, i tested two of the long lasting lipsticks, one darker and one light as well as a Xxxl lip gloss in a Nude.  The lipstick wears well but i found the Lighter color (01 wear only a smile) to be a bit pasty on my lips and it also showed my dry lip skin and i would suggest if you want to wear this that you first exfoliate the lips cause it really does show up everything , it worked a bit better when combined with the Lip gloss! The darker shade lipstick in 03 come naturally was a lot more up my alley and wears very well! They do match well with the whole nude look 🙂 And the Xxxl Lip gloss is very glossy, like very glossy lol. not really something im in to cause its a bit too sticky for me but it does give the lips good volume and they stand out wonderfully with shine! but like i say its just too sticky for me!

Essence Nude Lipstick

Lipgloss and Lipstick colors left to right . Xxxl Gloss 01 shy beauty,  Long lasting Lipstick in 03 come naturally ! And Long Lasting lipstick 01 wearing only a smile.

Then by now i am sure you all know how much iv been enjoying the latest Essence nail range and the Gel nail polish! They are just so fantastic! long lasting and the colors are great. I also loved the Nude ones as well as the very fun Matt top coat that gives a lovely effect when combined with the shiny gloss look! you can read my previous nails post to check out more about the colors .

essence nails

Then Lastly i have the Lash Princess false lash effect Mascara, this one i was actually rather impressed with! it gives very long thick black false lash looking lashes so that’s a great budget buy if you are trying to get that Effect!! Also i tried the silky touch blush, its very lovely, feels so soft on skin and the peachy pink ish color works well and blends easily! definitely worth a try and all these products are very affordable!

Essence LAsh princess mascara and blush

Worth going out and buying some, great budget buys and you can get a good few items for your money, most of the products range from R30 to R100 and are good quality!

Xxx

11

Essence nails :) different colors fun !

Purple! hehe

Purple! hehe

IMG_20150425_145801

Iv been having so much fun with the Essence Gel nails range and the Lovely Matt top coat I got !! love it so much, the colors are fantastic and bright and the shine is amazing!! I get about 5 to 6 days wear out of this as long as im not being overly hard on my nails .

here are some pictures of some colors I tried and things I did after the last two weeks. the matt top coat I played with is also nice 🙂 cant wait to do a few more things with it!

Red

Red

The Red is shade “4 ever young”

red matt mixed

red matt mixed

IMG_20150430_152713 (1)

This pink is the shade 09 lucky and the shimmer layer I put over is 04 our sweetest day. such a girly color 🙂 and I loved the touch of shimmer with it! perfect pretty in pink shade.

Nude

Nude

this beautiful Nude shade is called “05 pure soul” , its not part of the Gel nails range but works just as well with the gel nails top and base coat. its Lovely and goes so well with all the nude winter makeup we have around these days! cant go wrong with this one!

rps20150429_140427

The Gel nail polish range works wonders,but do remember to use it with the proper top and base coat of the gel nails collection to get the right effect!!

toes

I even played around with it on my toes hehe.  you can get a whole range of colors at Dischem! there is so many I struggled to choose some. only R26 each i mean really!! could just buy them all lol

image

And don’t forget to pop over to my Facebook page for the Essence competition im running!!!!!

6

Essence The Gel nail polish! Amazing stuff!!!

I recently received some Essence The Gel nail Polish items, the top & base coats as well as two fantastic colors!  And i must say I’m even more excited now after trying them than I was when the courier dropped them off!image

The Essence the gel nail Polish range comes in many eye catching colors and it’s easy and simple to apply and give a salon gel effect without needing a Uv lamp and with the ultra long wear base coated and extreme shine long wear top coat it gives 60% better lastingness!  So you don’t have to worry about your mani chipping too quick! 😉

I started by cleaning my nails with a little nail Polish remover first just to get the nature oils and dirt off . I then applied the Base coat and gave it a few minutes to dry or tho I have to say it dried so quick I could actually have given it less time between coast but i am however used to being careful and not rushing.

After applying the base coated i grabbed the glamorous Red color in shade 11 4 ever young and I started to apply a coat, you can immediately see the quality of the nail Polish is thick like gel Polish with high shine and intense color, like you don’t get color like that from normal nail Polish! It’s not the thin see through crappy kinda first coat look, it’s already got a gel look to it and it went on easy and again dried fast! So I did two thin coats of the red before applying the top coat. But do be sure to check it’s dry between coats.

By this time I had actually forgot about the top coat lol cause its already so shiny that I actually didn’t think it needed it but for the sake of it lasting as long as they say it does it, I now did my top coat. The top coat is by far the best top coat i have had in a long time! The consistency of it was nice and the application went well and was easy, I’m sure anyone can manage getting the perfect manicure with these wonderful products! The shine is really out of this worl glass like gloss high shine finish!
imagerps20150424_150319

It really honestly was super easy to achieve and does look like you have had your nails done at the salon it looks so grand!! I highly recommend you try these out and please give me some feedback if you do!

And if your not convinced yet the price surely will! They go for R23 a color at dischem!!!!

image

Xx


3

My DIY gel nails at home using Essence and tip tip colors.

I recently went out and bought the essence gel nails at home mini LED light and the peel off gel base and uv gel top coat and primer.

Now note that I’ve been playing with this so much that my bottles are almost empty and look old haha. But it seems I am getting the hang off it.

I paid R99 for each of the gels and R240 for the mini LED light at dischem.

 So to keep it simple… Or as simple as I can 😉

 1)  start with clean buffed nails,  I did short nails this week cause I broke one (eeeeek 😦 ).

I clean my nails with a nail Polish remover and then apply the primer.

  2) i then Start with the peel off gel base and it’s best to do this in a room with good lighting so u can see the gel is applied to the whole nail and evenly and pls take care not to go over onto skin or the gel peels off faster and lifts at the sides.  Cause I was trying to be cheaper and bought the mini gel lamp i have to do like one finger at a time but lucky it only takes 20 seconds a nail to get it properly set. Once you have base coated all ur nails you can use bit of nail Polish remover to just wipe the sticky layer off, a quick wipe with cotton wool and a dash of nail Polish remover does the trick.

 3) this is the fun part! You can literally use any brand of nail Polish to paint a color over the gel base or do ur favourite nail art in your favourite Polish and color. Or even paint a color and sprinkle some glitter on it or stick a nail art sticker. Dischem has some nice glitters and bling for R39. Don’t worry about texture or small glitter bumps cause the top coat will cover it.

 4) so now once step 3 is dry and your happy with that you can now start putting on your gel top coat and again in a room with good lighting cause it really does help if u can see where the gel is and try to stay away from the skin but cover all the color and nail art so it doesn’t come off at the sides. It took me a bit of practice to get used to the consistency of the gel and how to manipulate and spread it. For drying time I do 30 seconds a nail under the LED lamp just to make sure. Then just quickly wipe with cotton wool and nail Polish remover to get the stickiness off and your DONE 🙂

The fact that the gel base is peel off means you don’t have to struggle with soaking off and can just lift a edge and peel off. It also doesn’t damage the nail. I did and re did and did again and my nails are still fine.

 Super easy and amazing salon quality!  I get up to two weeks out of it if done properly!!  On my toes it’s done a whole month!  

 essence